HU-064 升级款电磁炮制作套件


↑↑上方播放安装视频↑↑


HU-064 升级款电磁炮制作套件

Upgraded electromagnetic processing kit


Ⅰ、功能介绍 Function introduction

电磁炮是一种利用电磁力加速发射物体的武器技术。它使用电磁脉冲来加速弹丸到高速状态,然后以很高的速度发射出去。相比传统的火药武器,电磁炮具有更高的发射速度和更远的射程及更精准的弹道。

升级款电磁炮套件我们不仅仅增加了蓄力电路还增加了电平指示电路,使得升级款电磁炮蓄力更快、射程更远、发射速度更快等优点,并且可以清楚的观察到蓄力状况,当蓝色指示灯亮起时可以随时发射。

电磁炮主要技术包括:

电源系统:提供高电压的电力供应,用于产生强大的电磁力。常见的电源系统包括电容器或电池组。

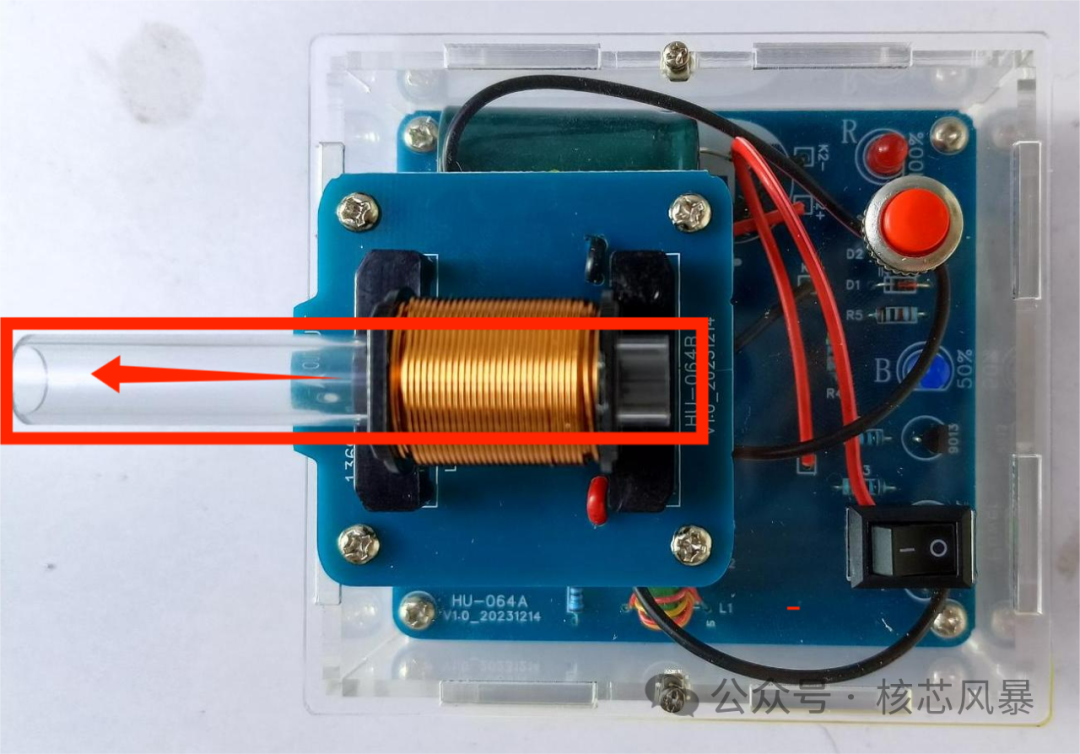
电磁加速器:用于加速发射物体的电磁设备,由线圈和支架组成。当通过线圈通电时,会产生强大的磁场,作用于发射物体上,使其加速。

控制系统:用于精确控制电磁炮的发射过程,包括触发发射以及监测发射速度等。

An electromagnetic gun is a weapon technology that uses electromagnetic force to accelerate the launch of an object. It uses an electromagnetic pulse to accelerate the projectile to a high speed and then launches it at a high speed. Compared with traditional gunpowder weapons, electromagnetic guns have higher firing speed, longer range and more accurate trajectory.

Upgrade of the electromagnetic gun kit we not only added the accumulator circuit but also added the level indicating circuit, so that the upgrade of the electromagnetic gun accumulator faster, longer range, faster firing speed and other advantages, and can clearly observe the accumulator status, when the blue indicator light can be fired at any time.

The main technologies of the electromagnetic gun include:

Power system: Provides a high voltage power supply for generating a strong electromagnetic force. Common power systems include capacitors or battery packs.

Electromagnetic accelerator: An electromagnetic device used to accelerate a emitted object, consisting of a coil and a bracket. When electricity is applied through the coil, a strong magnetic field is generated, which acts on the emitting object, causing it to accelerate.

Control system: It is used to accurately control the launching process of the electromagnetic gun, including triggering the launch and monitoring the launch speed.


Ⅱ、套件特性  Kit characteristics

1、由专用电路板、电磁炮线圈、六脚磁环电感等部件组成

2、炮弹发射速度快

3、能量蓄力快

4、炮弹射程远

5、电平指示电路,可以更加便捷的观察到蓄力状况

6、专属亚克力外壳进行绝缘保护

7、电源:25号电池 直流3V 

8、工作电压:3V

9蓄力电流:50~65mA

10、发射电流:70~80mA

11PCB长度:85x78mm+50x53mm,纯手工测量,有1~2mm误差

12、外壳长度:94x87mm,纯手工测量,有1~2mm误差

1, by the special circuit board, electromagnetic gun coil, six-pin magnetic ring inductor and other components

2, the projectile firing speed is fast

3. Fast energy storage

4. The shells have a long range

5, level indicating circuit, can be more convenient to observe the storage condition

6. Exclusive acrylic shell for insulation protection

7, power supply: 2 No. 5 batteries DC 3V

8. Working voltage: 3V

9, storage current: 50~65mA

10, the emission current: 70~80mA

11, PCB length: 85x78mm+50x53mm, pure manual measurement, there is 1~2mm error

12, shell length: 94x87mm, pure manual measurement, there is 1~2mm error

Ⅲ.元件清单BOM

序号

名称

Name

标号/Label

数量/Number

备注/Note

1

直插开关二极管 1N4148

DIP-Switching diode 1N4148

D1

1

有极性heteropolarity

2

2EZ91D5稳压二极管 2W 91V

2EZ91D5 Zener diode 2W 91V

D2

1

3

船型开关 3A/250V

Hull switch 3A/250V

K1

1


4

DS-316微型按键

DS-316 microkeying

K2

1


5

直插电解电容  1000UF

DIP E-capacitor l000uF

C1

1

 有极性:

长+短-

Polarity:

 long + short -

6

5mm 绿发绿 直插LED

5mm RedDIP LED

LED1

1

7

5mm 蓝发蓝 直插LED

Smm Green DIP LED

LED2

1

8

5mm 红发红 直插LED

Smm Blue DIP LED

LED3

1

9

直插电阻1K

DIP resistor 1K

R5

1


无极性

heteropolarity

10

直插电阻 5.1K

DIP resistor5.1K

R1、R6

2

11

直插电阻10K

DIP resistor 10K

R3、R2

2

12

直插电阻470K

DIP resistor 470K

R4

1

13

六脚磁环电感

Six-pin magnetic ring inductor

U1

1


14

直插三极管S 9013

DIP-Triode S 9013

Q1,Q2

2


15

电磁炮线圈

Gun coil

L4

1


16

红黑并线 120mm

Red and black lines 120mm


3


17

铁柱炮

Pole Gun


2


18

塑料炮筒

Plastic barrel


1


19

电池盒2节5号

Two batteries in box 5


1


20

双面胶

Double-sided tape


1


21

电路板

PCB


2


22

螺丝包

Screw bag


1


23

亚克力外壳

Acrylic case


1

选配/assorting

24

说明书

specification


1


Ⅳ.电路原理&元件分布图  Schematic&Component map

高压危险!!!

在安装电容之前或使用过程中需要补焊等情况,请先对电容进行放电,否则电容会造成短路,触发危险!!!

High voltage danger!!!

 Please discharge the capacitor before installation or during use or when repair welding is required, otherwise the capacitor will cause short circuit and trigger danger!!!

Ⅴ. 焊接及安装 Welding and installation
一、元件焊接
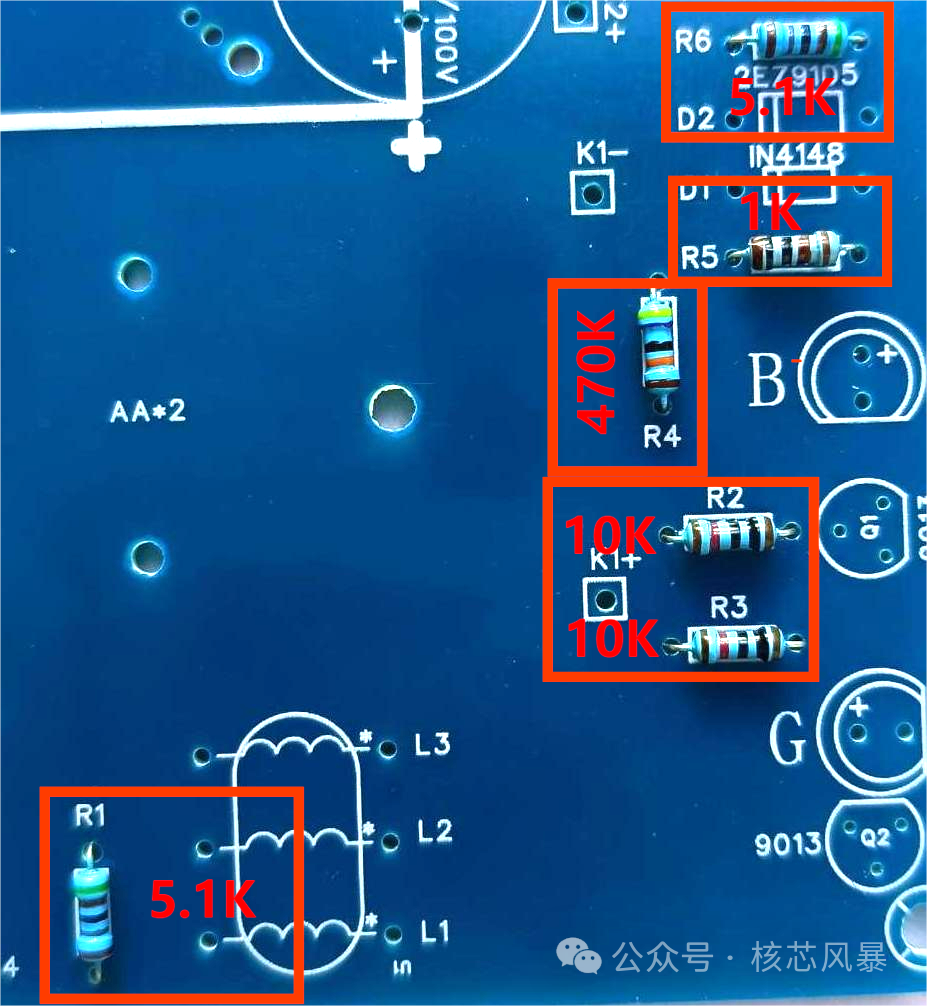
1.分别进行焊接1K、5.1K、10K、470K电阻。
一、Component welding
1.Welding 1K, 5.1K, 10K, 470K resistors respectively.
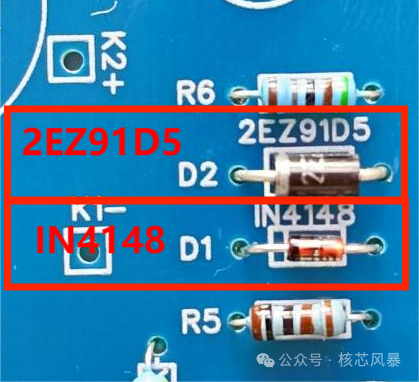
2.焊接2EZ91D5稳压二极管和IN4148,注意正负极,阴影部分为负极。
2. Weld the 2EZ91D5 regulator diode and IN4148, paying attention to the positive and negative electrodes, and the shaded part is the negative electrode.
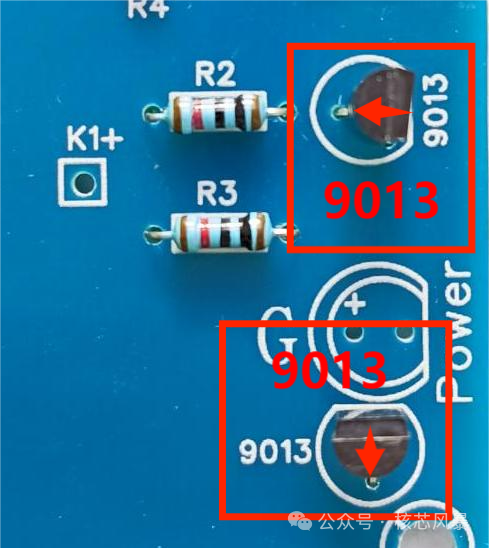
3.焊接9013三极管,注意三极管极性。
3. Weld 9013 triode, pay attention to the triode polarity.
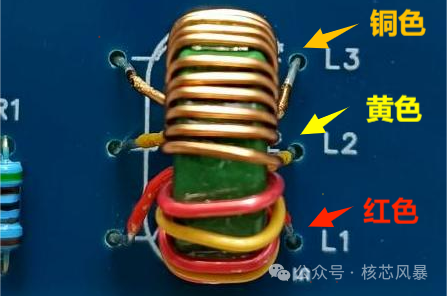
4.焊接磁环电感,一定要按照图中颜色依次焊接。
4. Weld the inductance of the magnetic ring according to the color in the figure.
 
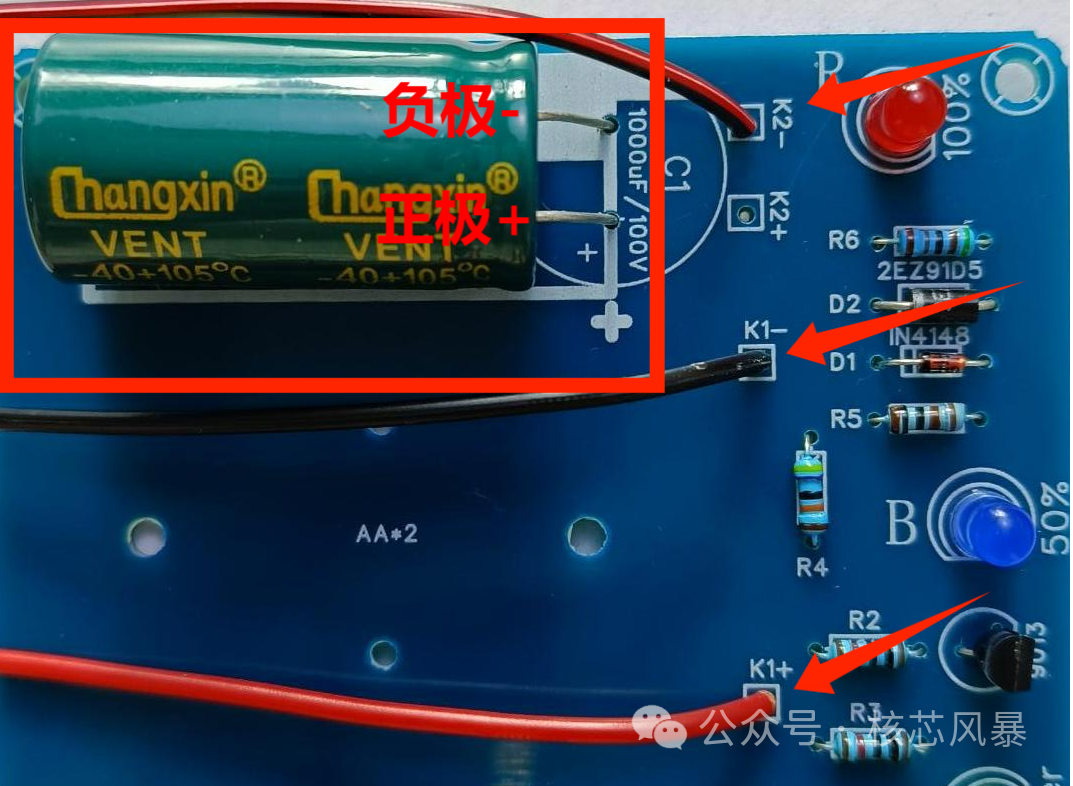
5.先焊接1000uF电容,注意正负极!在K2-,K1+,K1-处焊接三根导线。
5. Weld 1000uF capacitor first, pay attention to the positive and negative poles! Weld three wires at K2-, K1+, K1-.
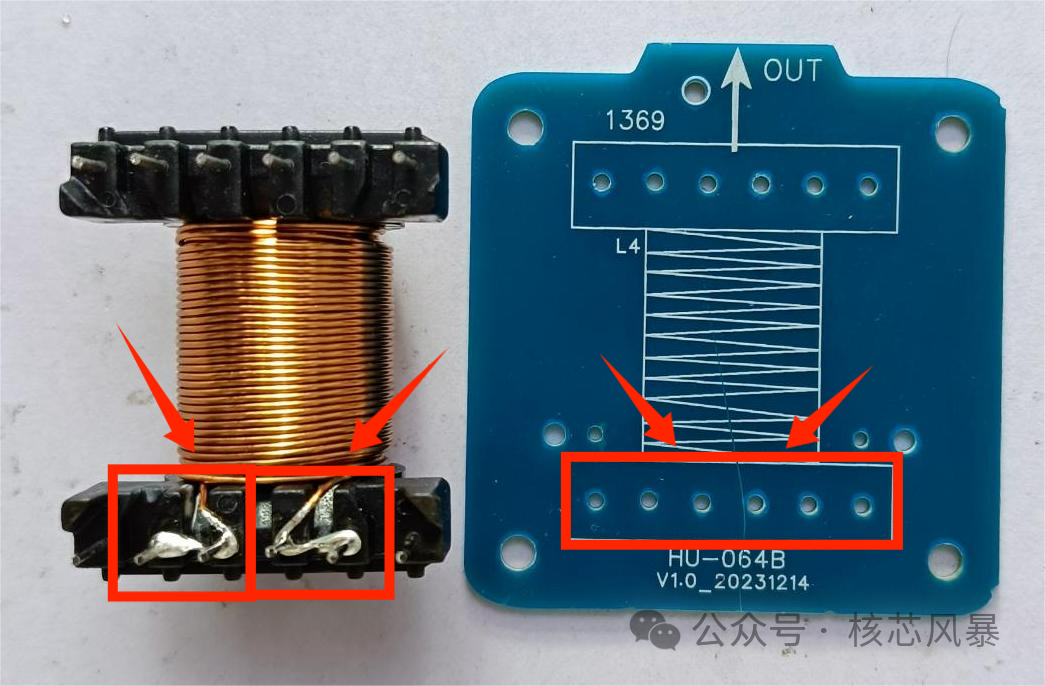
6.注意电磁炮线圈有焊锡的导线在线圈下方,正确的插入到电路板的下方,进行焊接。
6. Note that the solder wire of the electromagnetic gun coil is under the coil, and insert it correctly under the circuit board for welding.
7.拿出两个新的导线焊接在小的电路板上,焊接完成之后从电路板的孔位穿到电路板的下面。
7 Take out two new wires and weld them on the small circuit board. After welding, pass them through the holes of the circuit board to the bottom of the circuit board.
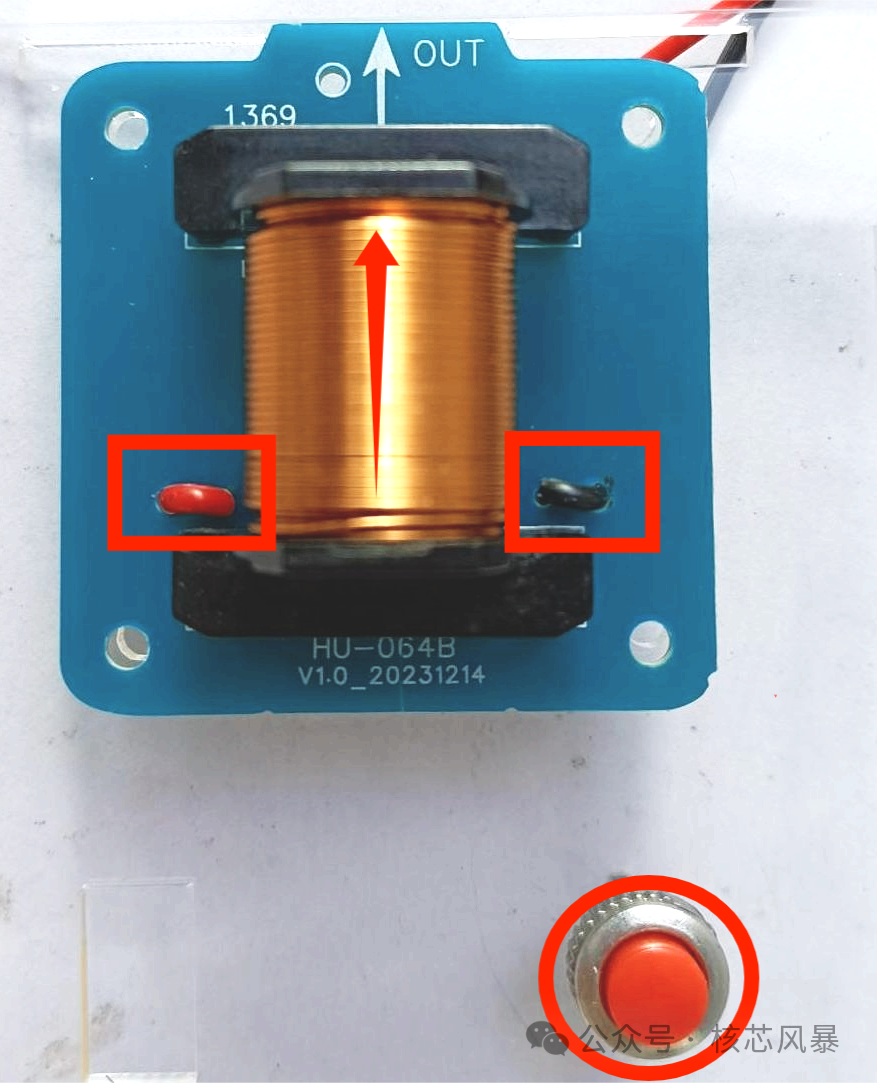
8.把圆形按键安装在亚克力外壳上,把电磁炮线圈的两根导线从外壳的小孔内穿过。
8. Install the round button on the acrylic shell, and pass the two wires of the electromagnetic gun coil through the holes in the shell.
 
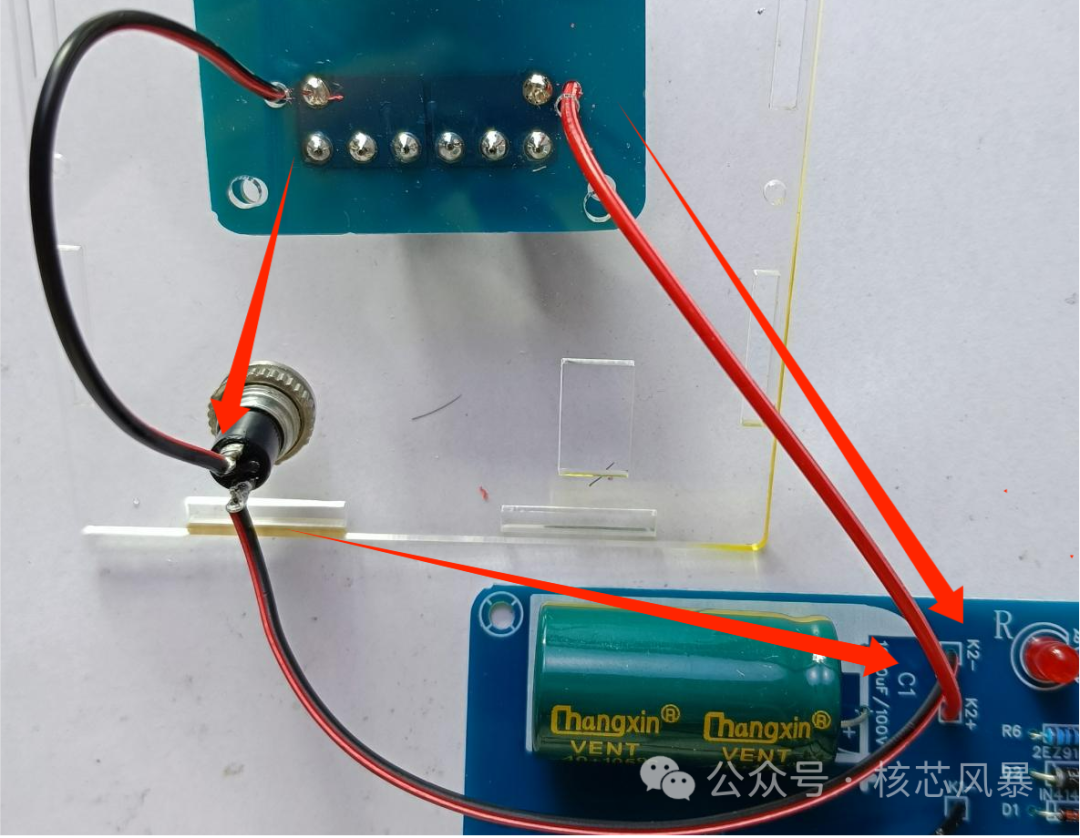
9.电磁炮线圈一根导线接圆形按键,另外一根导线接电路板K2-,圆形按键另外一端接K2+。
9. One wire of the electromagnetic gun coil is connected to the circular button, the other wire is connected to the circuit board K2-, and the other end of the circular button is connected to K2+. 
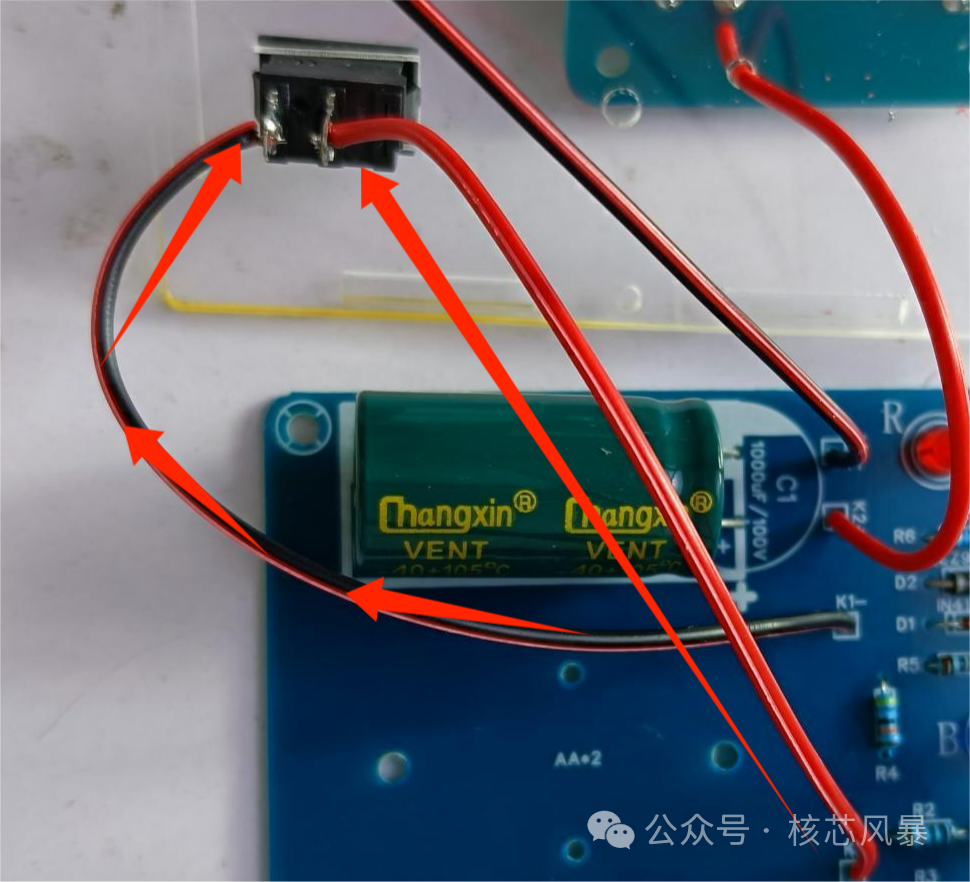
10.船型开关一侧接电路板K1+,另外一侧接K1-。
10、One side of the ship switch is connected with circuit board K1+, and the other side is connected with K1-.
 
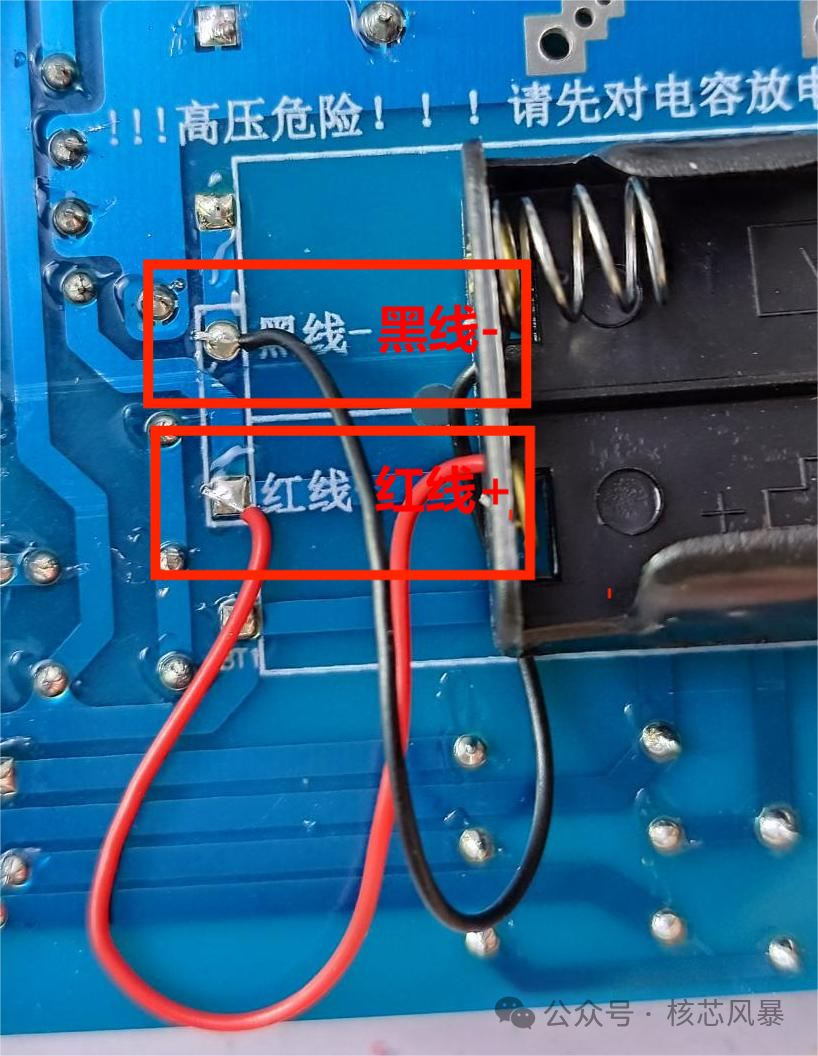
11.焊接电池盒,注意电池盒正负极,与电路板的丝印对应。
11. Weld the battery box, paying attention to the positive and negative terminals of the battery box, which correspond to the screen printing of the circuit board.
 
二、外壳安装
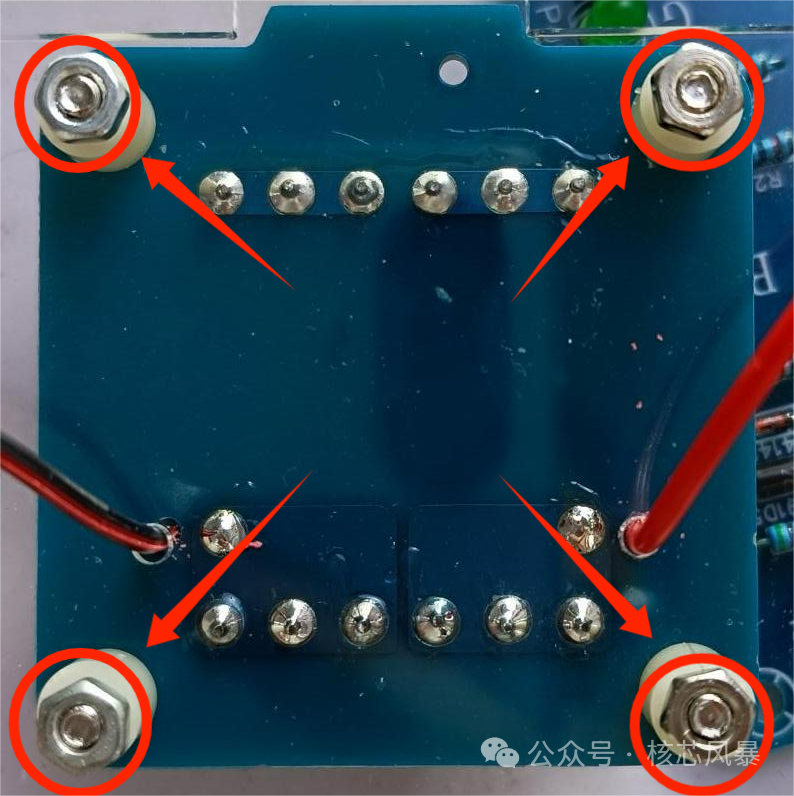
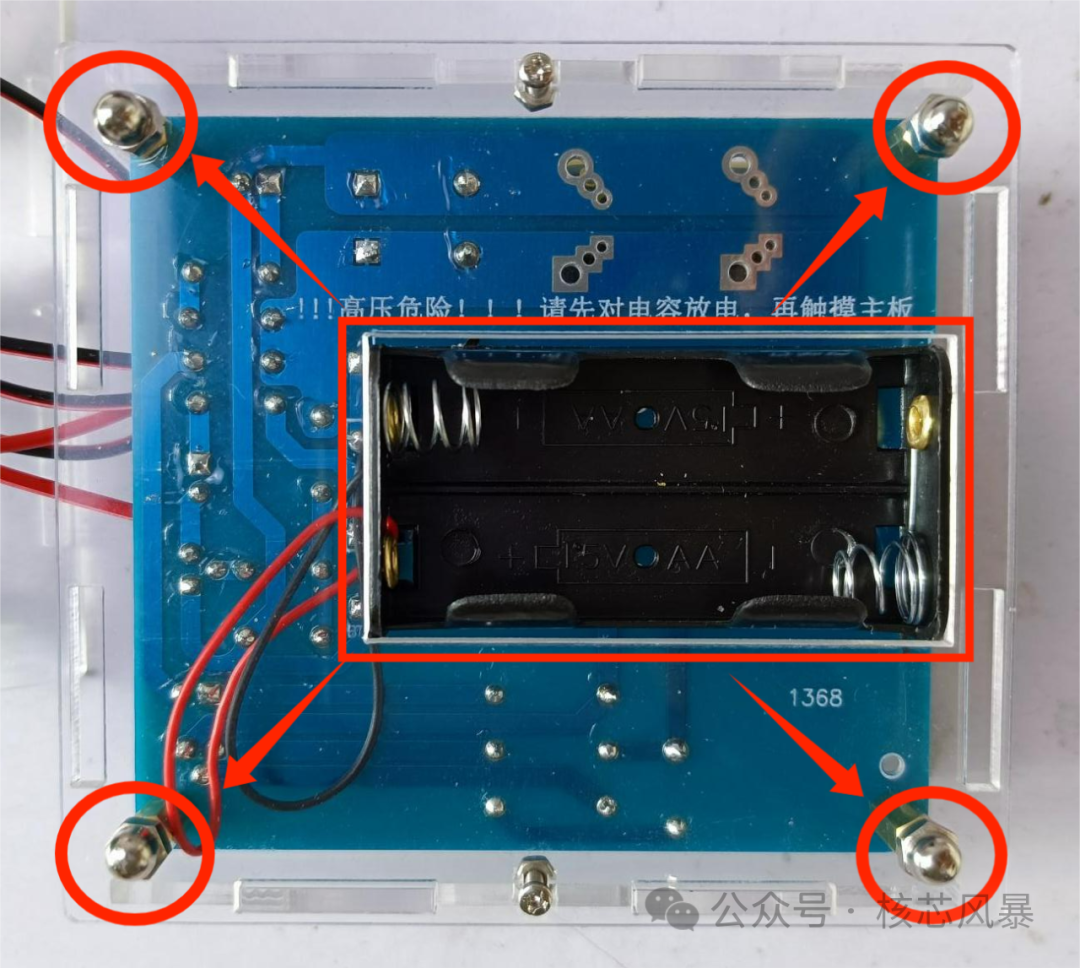
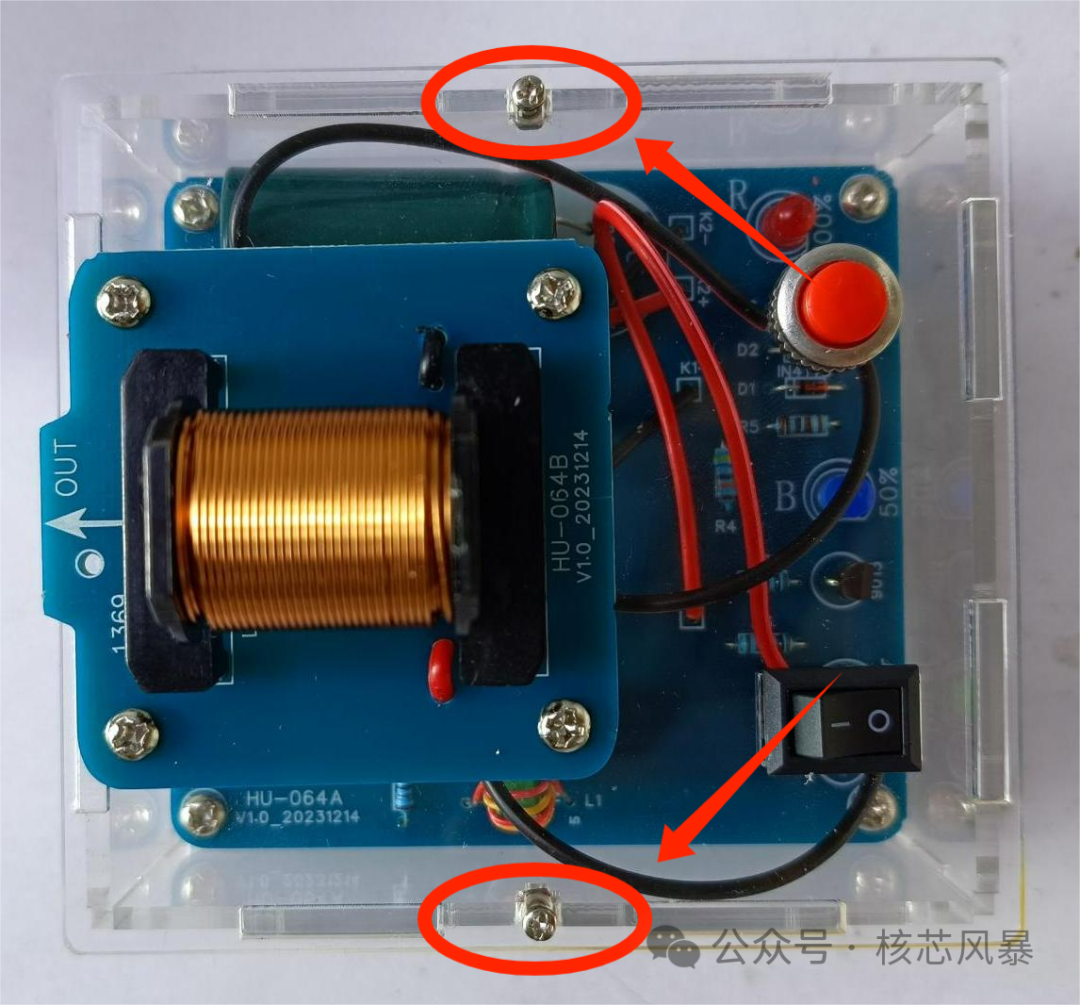
1.用M3*12螺丝贯穿隔离柱、小的电路板和外壳,并用M3螺母固定。
二、Shell mounting
1. Use M3*12 screws to penetrate the isolation column, small circuit board and housing, and secure it with M3 nuts.
 
2.用M3单通铜柱和M3*5螺丝进行固定。
2. Fixed with M3 single-pass copper column and M3*5 screws.
 
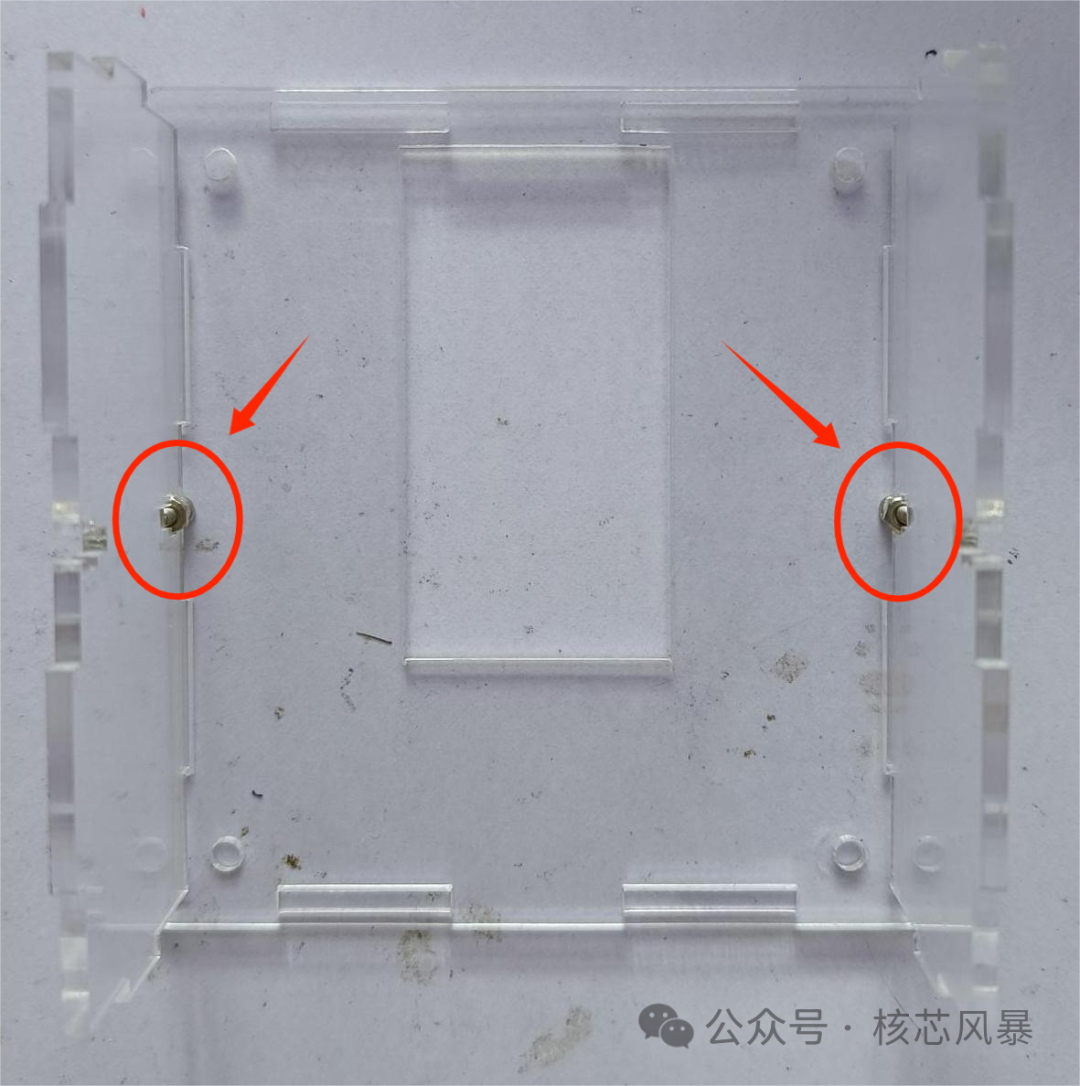
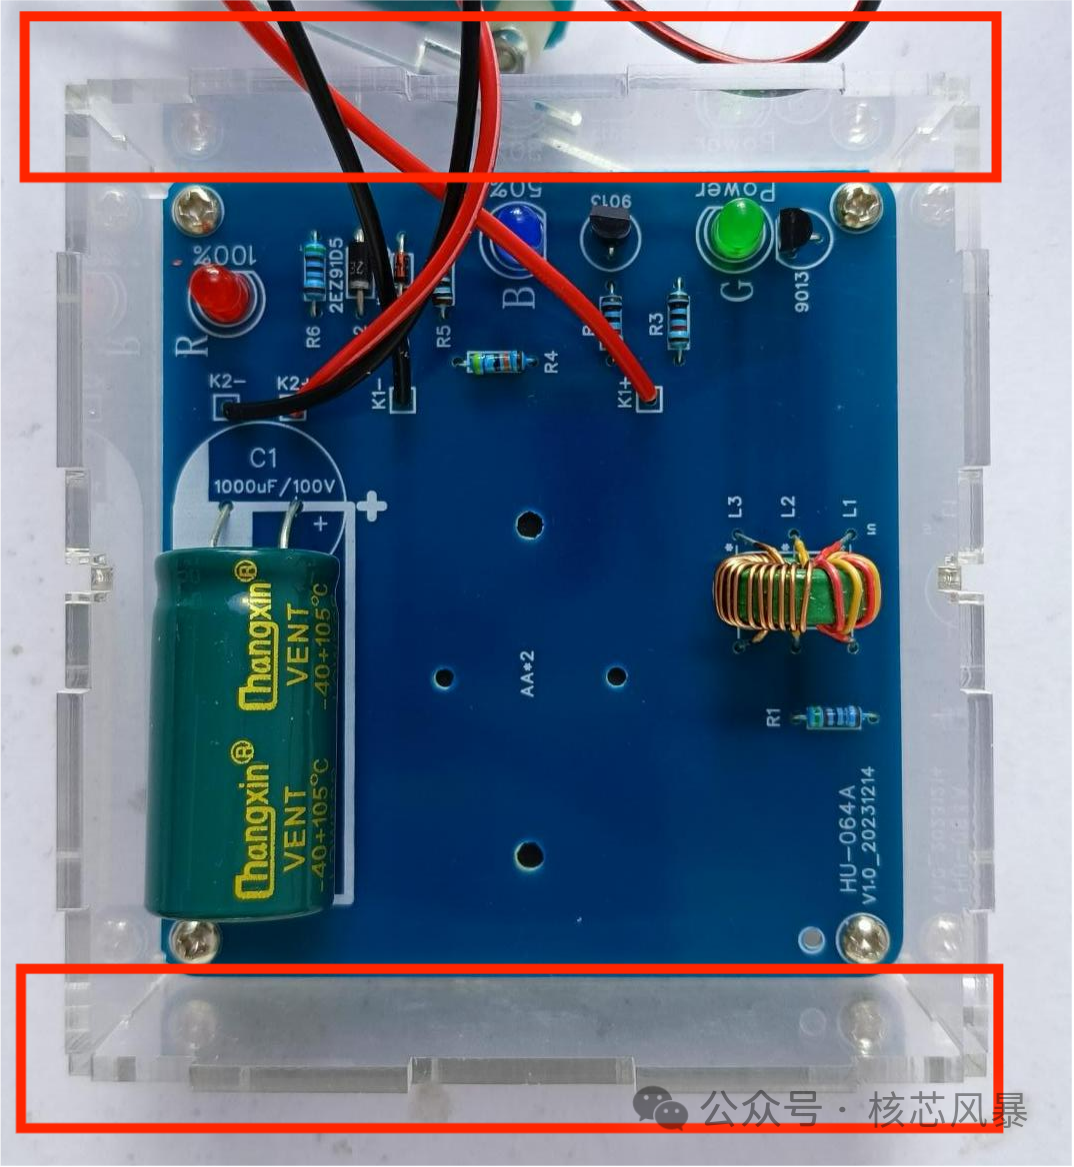
3.用M2螺丝和螺母把底部外壳和两个侧边外壳固定。
3. Secure the bottom shell and two side shells with M2 screws and nuts.
4.把电池盒卡在底部外壳里面,并用M3半圆盖母进行固定。4. Clamp the battery case inside the bottom housing and secure it with an M3 semi-circular cover.
5.拿出另外两个侧板,对准孔位,卡在底部外壳里面。
5. Take out the other two side panels, align them with the holes, and stick them inside the bottom shell.
6.把顶部外壳和已经安装好的底部外壳用M2螺丝和螺母进行固定。
6. Secure the top shell and the installed bottom shell using M2 screws and nuts.
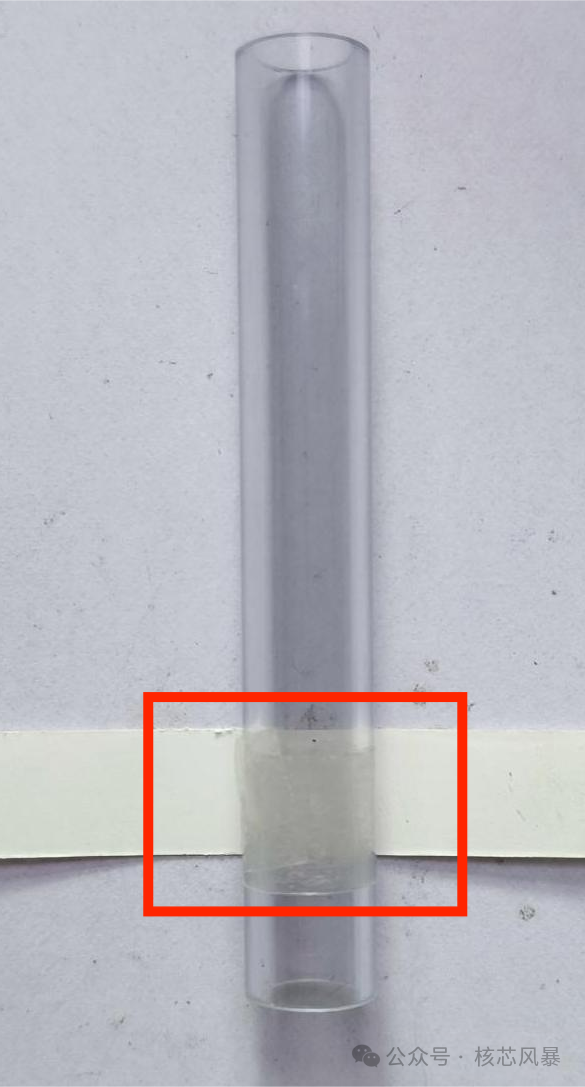
7.用一半双面胶即可,贴在距离炮口1CM处(如果装不进去,请减少双面胶,避免损坏电磁炮)。
7. Use half of the double-sided tape and stick it 1CM away from the gun muzzle (if it cannot be installed, please reduce the double-sided tape to avoid damaging the electromagnetic gun).
8.从后往前,缓慢把炮筒固定在电磁炮线圈里面。
8. From back to front, slowly fix the barrel inside the electromagnetic gun coil.
 
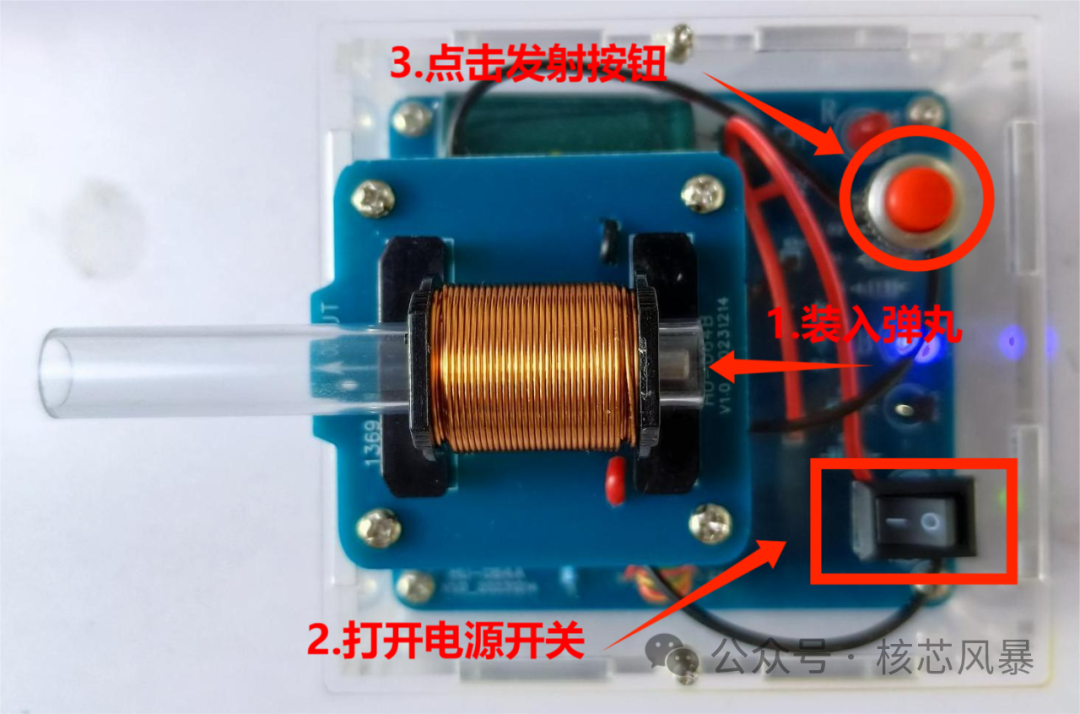
9.弹丸放进炮筒,打开电源开关,蓝灯亮起,按下圆形按键,即可发射。
9. Put the projectile into the barrel, turn on the power switch, turn on the blue light, press the round button, you can launch.

电磁炮能量蓄满状态时红灯亮起,由于电磁炮蓄满时间较长,并且电池电量逐渐减少,红灯可能不亮,当蓝灯亮起时,即可发射。When the electromagnetic gun energy storage state, the red light is on, because the electromagnetic gun storage time is longer, and the battery power is gradually reduced, the red light may not be on, when the blue light is on, you can launch.

 
、使用说明 Instructions for use
1.拨通电源开关(船型开关K1)此时绿色发光二极管亮起,电路开始对储能电容充电。
2.等待约10-30秒蓝灯完全亮起,此时储能电容已充满至一半电荷左右,也可以进行发射。
3.再等待约2-3分钟红色发光二极管也亮起(或许不亮),此时储能电容已充满电荷发射工作准备就绪。
4.将弹丸(圆柱形碳钢棒)从炮管后部塞入,其尾部要与炮管尾部平齐(可以自己尝试变化不同位置,每次1MM,调整到炮弹发射最远距离)。
5.按下发射按钮(圆形开关K2),炮弹飞出炮管,发射过程完成。注意按下发射按钮的动作要干脆,按下后要尽快松开。
注意事项:
1.本装置内部工作电压最高可达90~100V,已经超过国际安全电压标准36V,因此在其通电工作时,不可触摸内部电子元件,否则会发生电击事故
2.外部电子元件如线圈的绝缘皮较薄,要避免擦碰造成破损漏电。开关处电路也是较为薄弱,如果没有外壳的版本风险会更高,在使用过程中请注意安全。
3.自行组装的电路板难免存在错误或故障,如升压电路部分已能正常工作,有可能已经把储能电容(1000uF/100V)的电压充到较高的数值,造成电击隐患。因此在排查故障并进行处理之前,首先要用万用表测一下储能电容两脚的电压,或直接用根塑料皮导线(两端剥皮露出铜丝),捏住塑料皮部分用两端铜丝触碰该电容两脚进行放电操作,电荷完全释放后电容电压会降到0V,随后即可安全地进行操作。
1. Turn on the power switch (boat type switch K1). At this time, the green light-emitting diode lights up and the circuit begins to charge the energy storage capacitor.
2. Wait for about 10-30 seconds for the blue light to completely light up, at this time the energy storage capacitor has been full to about half of the charge, and it can also be launched.
3. Wait for about 2-3 minutes for the red light-emitting diode to also light up (or not), at this time the energy storage capacitor is fully charged and ready for emission.
4. Insert the projectile (cylindrical carbon steel rod) from the rear of the gun barrel, and its tail should be flush with the tail of the gun barrel (you can try to change different positions, 1MM each time, adjust to the farthest distance of the projectile launch).
5. Press the firing button (circular switch K2), the shell flies out of the barrel, and the firing process is complete. Note that the action of pressing the launch button should be crisp, and release as soon as possible after pressing.
Note:
1. The internal working voltage of the device can reach up to 90~100V, which has exceeded the international safety voltage standard 36V, so when it is powered on, it can not touch the internal electronic components, otherwise there will be an electric shock accident.
2. The insulation of external electronic components such as coils is thin, so it is necessary to avoid damage and leakage caused by rubbing. The circuit at the switch is also relatively weak, if there is no shell version of the risk will be higher, please pay attention to safety during use.
3. The self-assembled circuit board inevitably has errors or faults, such as the booster circuit part has been able to work normally, it may have charged the voltage of the energy storage capacitor (1000uF/100V) to a higher value, resulting in hidden dangers of electric shock. Therefore, before troubleshooting and handling, first of all, use a multimeter to measure the voltage of the two pins of the energy storage capacitor, or directly use a plastic wire (both ends are peeled to expose the copper wire), pinch the plastic part and touch the two pins of the capacitor with the copper wire at both ends to discharge the operation, the capacitor voltage will be reduced to 0V after the charge is completely released, and then the operation can be safely carried out.
 
关注下次寻找不迷路
更多内容关注公众号


首页    安装教程    趣味DIY创想系列    HU-064 升级款电磁炮制作套件